To connect your MIDI device to SooperLooper, you first need to use a MIDI patchbay such as the one found here. This only applies to the "standalone" application, the AudioUnit gets its midi events directly from the host.
Do learn-style control binding by choosing the learn option from the context menu's of a button, slider or control. Control-Middle-clicking on the button or slider is a shortcut to start learning.
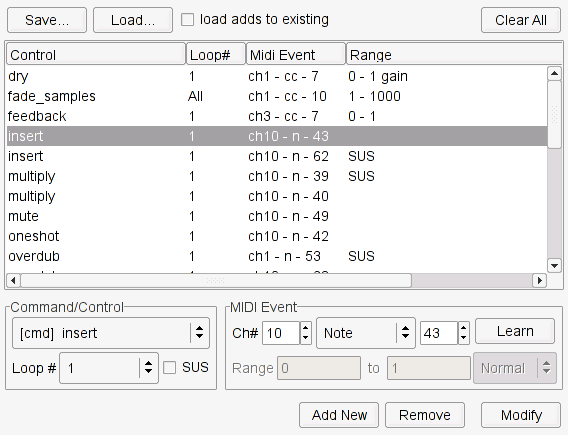
The main area of the MIDI Bindings window contains a list showing the currently bound commands and controls. Below the list are controls which reflect the currently selected item, allowing for modification of the selected binding, or the addition of a new binding.
The Command/Control area allows for picking the specific command (record, overdub, etc) or one of the available numeric or togglable controls (feedback, output level, sync, etc), and which loop index the binding will control. The SUS option makes the binding behave as a momentary control with note and CC events (see MIDI commands). The All choice will apply the command to all loop instances, the Selected will apply it to currently selected loop instance (changed via GUI keyboard controls 0-9 or the global controls selected_loop_num, select_prev_loop, select_next_loop, and select_all_loops which can be bound to midi events themselves).
The MIDI Event area allows editing of the midi event parameters for a binding. The Range entries become active with controls to specify how the midi 0-127 values are mapped to the target control. The scaling type choice may be either Normal (linear) or Gain (logarithmic). The first entry maps to midi value of 0, the second entry maps to 127. For instance, on the gain and level controls, the native range of the control is from 0 -> 1, so a midi event with 127 value will set the control to 1, and 0 for 0. If you wanted to ignore the lower end of the range, you could set the min to 0.5, and then an event with 0 value will set the value to that.
If the Learn button is pressed, the next incoming midi event will set the controls to its value. Note that no binding is changed until Add New or Modify is pressed which adds a new binding or modifies the existing selected one respectively.
You can also load the intial bindings from the saved bindings file with the -m option (to the engine) or by specifying in the GUI's Looper Connection window. Example binding files are to be found installed in PREFIX/share/sooperlooper/presets/ directory with the extension '.slb'.